
Outdoor Craft Ideas: Rock Painting Tutorial

Looking for easy outdoor craft ideas for kids? Painting rocks outside is fun for all ages!
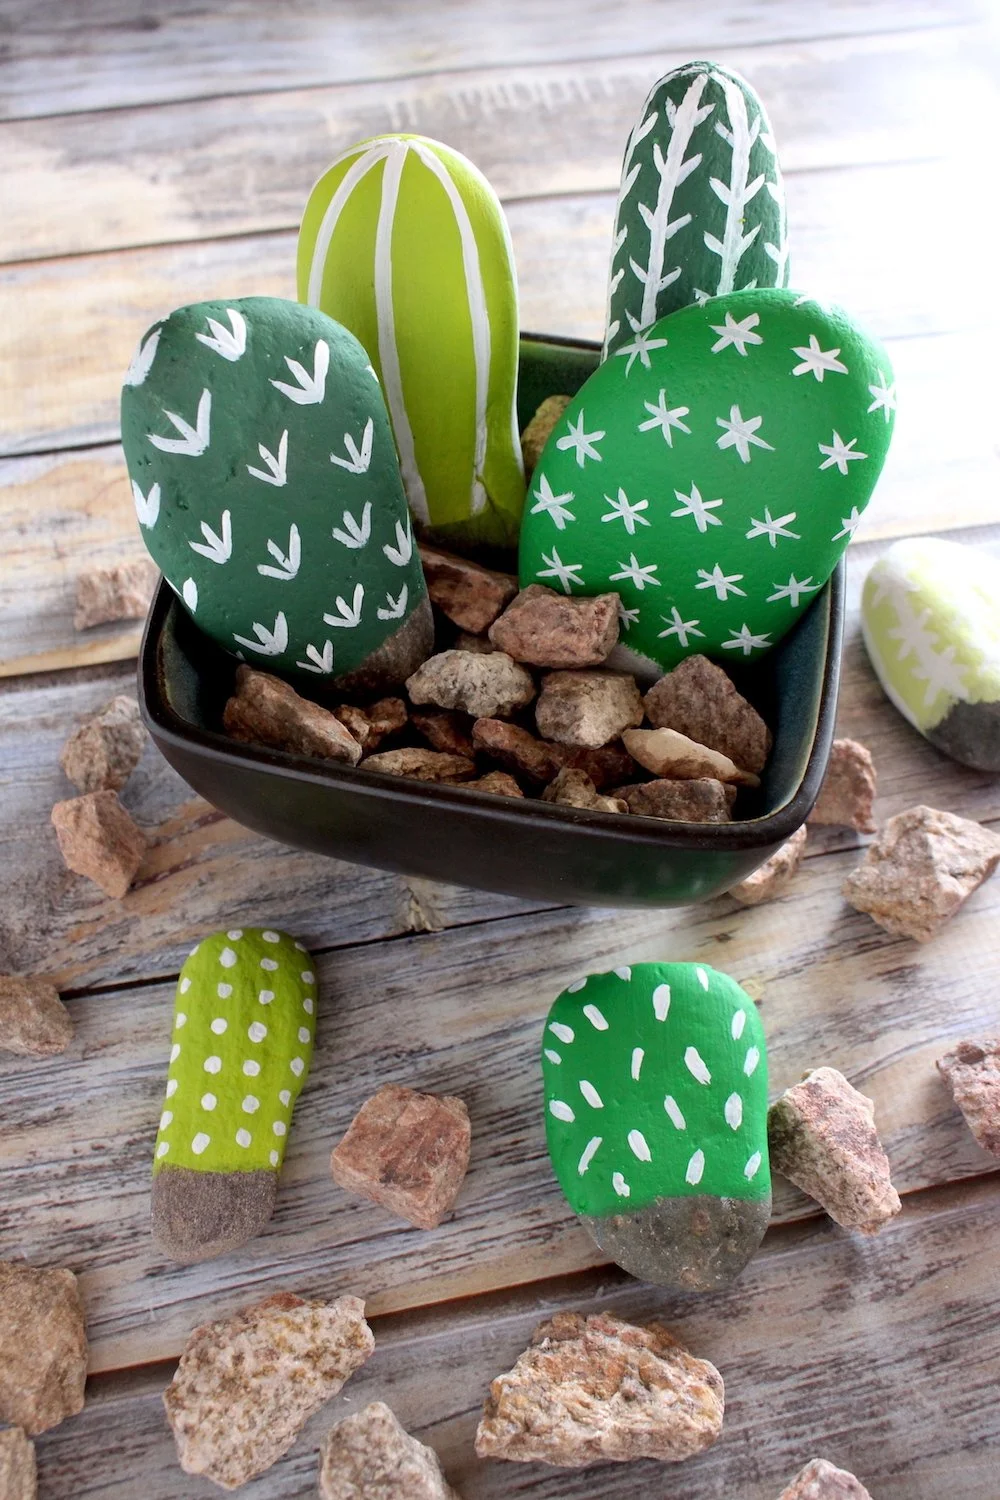
Painting garden rocks is a great outdoor craft idea for all ages. I’ll show you how easy it is to transform rocks into a planter full of colorful cacti and also how to paint rocks with other unique designs.

Materials
Rocks of various shapes and sizes (flat, smooth surface preferred--also look for more elongated or oval shaped rocks for the cactus)
Plant pot and small rocks or gravel
Assorted colors of acrylic paint (for the cactus I used: Yellow Green, Lemonade, Festive Green, Forest Green, and Snow Titanium White. Additional colors used: Ultramarine Blue, Turquoise Blue, Cadmium Yellow, Bright Orange, Napthol Red, Royal Fuchsia, Baby Pink, Purple Cow, Lamp Black)
Americana DuraClear varnish (matte)
Variety of paint brushes (Medium size to paint base coat; small and extra small for details)
Paint palette or paper plate and water container
Paper towels or rag
Old tablecloth or newspaper to protect your surface
Reference photos (optional) for cactus patterns

How to Paint Cactus Rocks
Wash your rocks with water to remove dirt off the surface. Dry with a towel. When the rocks are dry to the touch, paint the first side with a coat of white paint. (This will make colors pop and look brighter.) Add a second coat of white. Let dry and repeat the process on the other side.

Paint both sides of the rocks with two coats of gesso or white paint. No need to paint the very tips of the rocks, since they will be hidden in the final arrangement.
When the white layer is dry, paint the first coat on all the rocks with various shades of green. Once dry, add a second layer. Let dry and repeat on the other side.

Paint the rocks with various shades of green. At least two coats on each side.
Use a reference photo or practice your own patterns on paper with pen to get different designs. Paint on a scrap paper to be sure that the width of the brush is small enough to get the precise details you’d like.

Sketch pattern ideas on paper.
Once the green layers are painted and you can no longer see any white showing through, use your fine-tip brush to paint on details in white paint. I’ve only painted details on the front, since that will be the side facing out, but you can also paint details on both sides.

Use an extra small brush for fine details.

Try using a variety of colors and patterns!
When dry, add 1-2 coats of DuraClear to both sides (allowing layers to dry in between and each side to dry before coating the other side). This will protect your paint from chipping and also give it a little protection from the outdoors if you plan to keep it out in the backyard or patio.

Paint 1-2 layers of DuraClear to seal in the paint. Paint a little bit past the paint layer onto the rock to completely seal.
When the cactus rocks are dry, fill a planter pot with medium sized rocks or gravel. Fill it about ½ to ⅔ of the way and then begin to add your “cactus plants.” Start with the larger and taller cacti in the back, propping them up with the smaller rocks.
Give your cactus some room in between and add smaller rocks to fill in the gaps.
Add the smaller and shorter cacti in the front. Adjust the height by adding more gravel/small rocks in the planter underneath each cactus. Fill in any gaps or spaces with small rocks.

And that’s it! Display indoors or outside!
Variations
Here are some additional rock painting ideas, but feel free to paint whatever comes to mind! I’ve also found when rock painting with younger kids, it’s best to let them paint however they’d like, as sometimes it’s not easy for them to be as precise or follow the steps completely.

The steps and materials are all the same as the cactus project, with the addition of more colors. When painting with kids, be sure they wear old clothes or an apron, as acrylic paint is permanent. It will clean up off most surfaces with water and paper towels when still wet.
Shapes as Inspiration
Sometimes the shape of the rock guides your idea. This rock had a great heart shape, so I thought it would be fun to paint it pink and add flowers and other designs.

Paint 1-2 coats of white paint on the surface.

Paint purple dots around the border, add yellow dots for the center of the flowers. Paint flower petals around the center (waiting for each color to dry in between). Paint stems and leaves.
Another rock was broken in half and reminded my daughter of a cookie! So we painted it with a light brown paint mixed with white and added dark brown chocolate chips.

For the cookie, use True Ochre and a little bit of Titanium White. When dry, add “chocolate chips” with Burnt Umber.
Mandala Inspired
This is a simple design using different sized dots that radiate out from a center. Paint a base coat of black. When dry, paint a white circle in the middle and add smaller white dots around the circle. Continue to paint different sized dots around the main circle until you reach the edge of the rock. When each dot is dry, use a smaller brush (or the handle of the brush) to paint different colors on top of the dots.

Tip: use the handle end of the brush to get smaller dots.

Animals & Bugs
For the bee, paint a base coat of yellow. Paint the “head” and “stinger” and stripes with black. When dry, add white dots for eyes and when the eyes are dry, add smaller, black dots for the pupils. The ladybug is the same but with red base coat and black dots.

The bird is a base coat of Turquoise Blue with details (wings and feathers) painted in Ultramarine Blue. Paint feathers in with pinks and purple. Add eyes, eyebrows and beak last.

Faux Marbling and Drip Painting
These techniques are great for all ages, as the results are random and imprecise and produce unique, unexpected rock painting designs! It’s also a great way to use up any leftover paint. For faux marbling, add drops of random colors to a paper plate (works best if the colors are next to each other on the color wheel: red/purple/blue, blue/green/yellow, red/orange/yellow, so that when they mix, they don’t make brown or “muddy” colors). Then simply dip and smash your rock into the plate! Roll the edge of the rock in the paint to cover any blank spots.

For adding drips, it’s best to squeeze a few drops right out of the bottle. With this technique, you can use any color combination, as the colors will mostly stay separate and not mix.

When dry, be sure to add 1-2 coats of DuraClear to seal in the paint and make your painted rocks weatherproof. Have fun and enjoy these simple outdoor crafts! If you enjoyed this lesson on how to paint rocks and are looking for more easy and fun painting activities for kids, check out this free painting tutorial: Pop Art Cats!
